In this final part of our tutorial series on Serial Communication between Arduino and Processing, we’ll be bringing everything together to build an interactive Photobooth. The project demonstrates two-way communication between Arduino and Processing, utilizing buttons, LEDs, and a webcam to take and display photos. We’ll walk through the code step-by-step to show how the two platforms can work together to create an engaging experience.
How it works
Arduino handles the user interaction with hardware, including buttons and LEDs for visual feedback.
Processing handles the webcam, taking photos, and displaying them on the screen.
Serial communication between Arduino and Processing enables real-time control and feedback, ensuring both platforms are in sync throughout the photo-taking process.
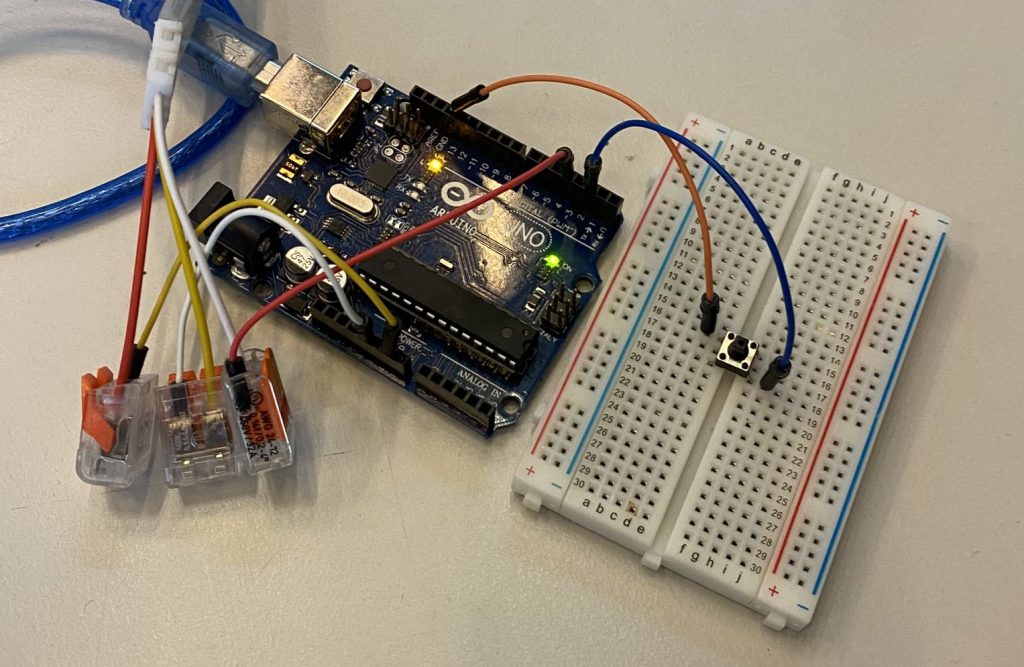
Hardware Setup
We’ll be using:
– Arduino Uno (or similar)
– A button: For triggering the photo capture
– A Neopixel LED strip: To give visual feedback to the user before taking the photo, simulating a countdown.
– A webcam: Internal or external Webcam connected to the computer running Processing to take photos.
Here’s how to connect everything:
1. Button 1 (Photo Trigger):
– Connect one leg of the button to “pin 2” on the Arduino.
– Connect the other leg to “GND”.
– Use the internal pull-up resistor by setting “pinMode(buttonPin, INPUT_PULLUP)” in the code.
2. Neopixel LED Strip:
– Connect the data pin of the LED strip to “pin 4” on the Arduino.
– Connect the ground (GND) pin of the LED strip to the GND of the Arduino.
– Connect the power (5V) pin of the LED strip to the 5V pin on the Arduino.
3. Power:
– The LED strip will need power to function properly, so ensure the Arduino is powered via USB or an external power source, especially if the LED strip has many LEDs.
The code
You can download both the Processing and Arduino code from the AIRLAB GitHub repository here. This folder contains:
– Processing code: “PhotoboothProcessing.pde”
– Arduino code: “PhotoboothArduino.ino”
We’ve filled out each of the two pieces of code with comments, aiming to make them as understandable as possible. We recommend taking a look at each of them before returning to the tutorial.
Key concepts of the Arduino code
– Button Input: We use “digitalRead(buttonPin)” to detect when the button is pressed. This initiates the photo countdown.
– Neopixel LED Countdown: The LEDs change color from red to yellow to green, and finally flash white, simulating a camera flash before the photo is taken.
– Serial Communication: After each countdown stage, a message is sent to Processing to indicate the current stage, which allows Processing to update the display accordingly.
Key concepts of the Processing code
– Webcam Feed: The webcam feed is continuously updated in the “draw()” function. When a photo is taken, the feed is paused and the captured image is displayed for 3 seconds.
– Countdown Display: The “updateCountdown()” function updates the countdown text that is displayed on the screen in real-time.
– Serial Communication: Processing listens for messages from Arduino and reacts accordingly by displaying countdown stages or taking a photo.
Testing and running the programs
Upload the Arduino code:
– Connect your Arduino to your computer via USB and upload the Arduino code using the Arduino IDE.
Run the Processing program:
– Once your code is ready, press the Run button in Processing. You should see the live webcam feed in the Processing window.
– Press the photo button connected to the Arduino, and the countdown should begin with the corresponding LED color and displayed countdown text.
– After the countdown finishes, a photo will be taken, and it will be displayed for 3 seconds before returning to the live feed.
Conclusion
This photobooth project demonstrates two-way communication can be integrated between Arduino and Processing to create an interactive, visual experience. Using buttons and LEDs on the Arduino side and handling a webcam in Processing, results in a fun, responsive photo-taking system which can be experimented with, and added upon. The principles of serial communication enabling cross-platform interaction provide a great foundation for more advanced projects in the future.
Experiment with adding more features, like saving the photos automatically, adding more LED effects, or customizing the user interface!
Happy coding!
Troubleshooting
Serial Port Issues:
– If you’re having trouble with the serial connection, ensure that the correct port is selected in both the Arduino and Processing code. You can check the available ports in the Arduino IDE (Tools > Port) or Processing’s “Serial.list()” function.
Webcam Feed Not Showing:
– If the webcam feed is not displaying in Processing, make sure the correct camera is selected in the “Capture”-object. You may need to modify the “cam = new Capture(this, …)”-line to match your camera’s resolution.
– Ensure that your webcam is not being used by another program, as it can only be accessed by one application at a time.
LED Strip Not Lighting Up:
– Double-check the wiring of the LED strip, especially the data pin connection.
– Ensure the 5V and GND connections are solid and that the strip has enough power.
– Make sure the “FastLED.show()” command is being called after setting the LED colors.
Button Not Responding:
– Ensure the button is properly connected to the correct pin and GND.
– If the button seems unresponsive, try adding a slight debounce delay in the Arduino code after reading the button input. This will help prevent multiple readings from a single press.
– Try replacing the button if it still doesn’t work.