Controlling an LED Strip with Processing and Arduino
In this tutorial, you’ll learn how to control an addressable Neopixel LED strip connected to an Arduino using a simple Processing program. This is achieved through serial communication, where the Processing program sends data to the Arduino, which then controls the LEDs based on the input.
What you’ll need:
- A computer with both Processing and Arduino IDE installed.
- An Arduino board (e.g., Arduino Uno).
- An addressable LED strip (e.g., Neopixel strip).
- Breadboard and jumper cables to connect the components.
How it works
- Processing program: The Processing code creates a graphical interface with a split canvas (red and green). Clicking on either side sends a value to the Arduino based on where you click and the vertical position of your mouse (
mouseY). - Arduino code: The Arduino receives this data and uses it to control the saturation of two sections of the LED strip. Clicking on the left half of the Processing canvas controls one half of the LED strip, and clicking on the right controls the other half.
Code and setup
You can download both the Processing and Arduino code from the AIRLAB GitHub repository here. This folder contains:
- Processing code:
processingSendSerialCommunication.pde - Arduino code:
arduinoRecieveSerialCommunication.ino
Connecting the components:
- Arduino pin 4: Connects to the data pin of the LED strip.
- 5V pin: Powers the LED strip.
- GND: Ground connection for the LED strip.
Processing code overview
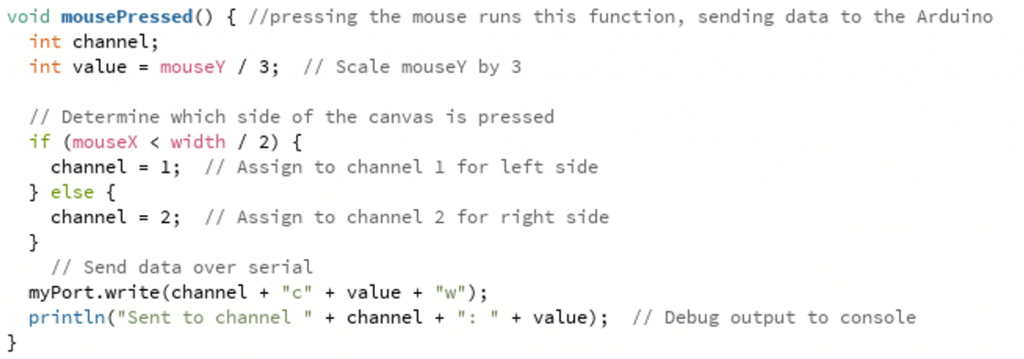
The Processing program creates a window divided into two color sections. Each section sends data when clicked. The key concepts in the code are:
- Canvas split: Left side is green (controls one part of the LED strip), and the right side is red (controls the other part).
- Mouse input: Clicking on the canvas sends data (channel and value) to the Arduino over serial communication.
- Data format: Data is sent in the format
channel + "c" + value + "w", wherechannelidentifies which part of the LED strip to control, andvalueis the intensity.A screenshot of the code.
Screenshot of the Processing Code
Arduino code overview
The Arduino receives data from Processing and controls the LED strip accordingly. The strip is divided into two sections, controlled by channel 1 and channel 2. The key concepts in the code are:
- FastLED library: Handles communication with the Neopixel strip.
- Channel and value: The Arduino processes serial data and assigns values to the LEDs based on the channel.
- LED control: The saturation (brightness of green or red) changes based on mouse input from Processing.
Testing and running the program
- Run the arduino code: Upload the
arduinoRecieveSerialCommunicationcode to your Arduino. - Run the processing code: Launch
processingSendSerialCommunicationfrom the Processing IDE. Make sure the Arduino is connected. - Interact: Click on the left or right side of the Processing canvas. The saturation of green on the left LEDs and red on the right LEDs will change based on where you click vertically on the canvas.
Troubleshooting tips
- Check serial port: Make sure the correct serial port is selected in Processing.
- Baud rate: Ensure both Processing and Arduino are set to communicate at 9600 baud.
- Wiring: Verify the connections between the Arduino and the LED strip. Ensure the data pin is correctly connected to pin 4 on the Arduino.
- FastLED library: If you haven’t installed the FastLED library, you can do so in the Arduino IDE’s library manager.